Settings & Configuration
All administration happens in one Settings window. Open it from the Settings entry in the Admin section of the sidebar — the only admin entry there. The window lists its sections on the left, grouped by topic, and shows the selected section on the right.
What-If mode
Settings is unavailable while a What-If plan is open — the entry is disabled with an explanation. Apply or discard the plan first.
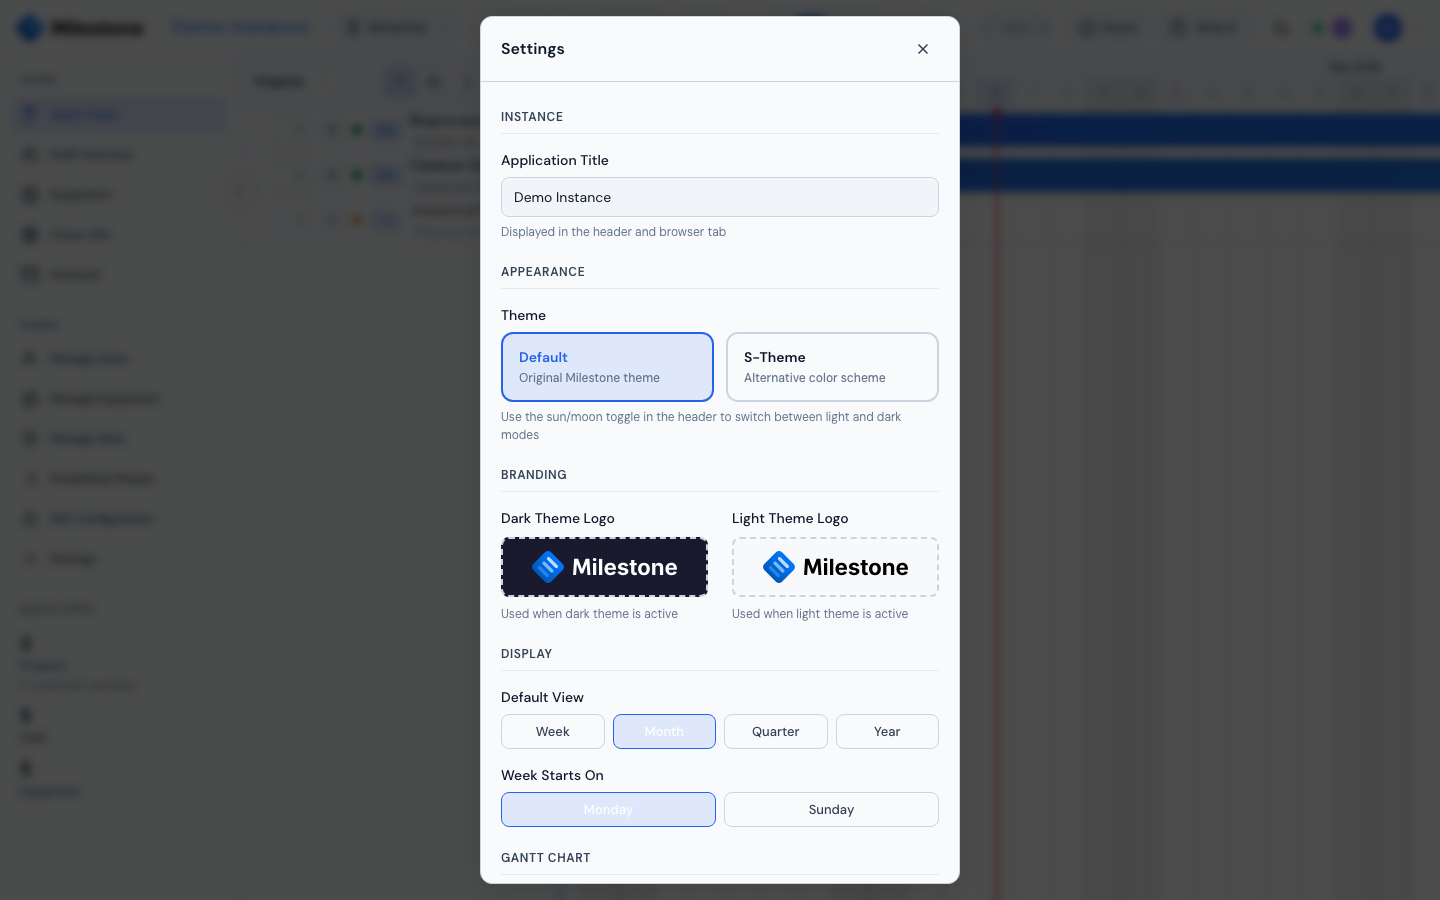
Settings Sections
| Group | Section | What it manages | Who sees it |
|---|---|---|---|
| General | General | Instance title, theme, logos, display defaults | Admin (Superuser: theme only) |
| Sites & calendar | Sites | Locations, country/region, site Excel export | Admin |
| Bank holidays | Public and custom holidays per site | Admin, Superuser | |
| Company events | Audits, meetings and site closures on one or more sites | Admin, Superuser | |
| People | Users | Accounts, roles, sites, skills | Admin, Superuser |
| Skills | Skill tags for staff | Admin, Superuser | |
| Absence types | Categories of time off, shared by all sites | Admin | |
| Resources | Equipment | Lab equipment on one or more sites — see Equipment Booking | Admin, Superuser |
| Equipment types | Equipment categories | Admin, Superuser | |
| Projects | Predefined phases | Phase templates for new projects | Admin, Superuser |
| Tags | Project tags, tag groups and the sites they apply to | Admin | |
| Integrations | SSO | Microsoft Entra single sign-on for this workspace — see Organization & SSO | Admin |
Each person only sees the sections their role can change: superusers see General (theme only), Bank holidays, Company events, Users, Skills, Equipment, Equipment types and Predefined phases. Regular users have no Settings entry; they manage their own time off from My absences in the user menu.
Unsaved changes
If you switch section or close the window while a form holds unsaved input — in General, Users, Equipment, Sites, Skills, Bank holidays, Company events, Absence types, Equipment types or Tags — Milestone asks before discarding it. Clicking outside the window never closes it.
Saving is protected against double submission: pressing Enter twice or double-clicking a Save, Add or Delete button runs the action only once.
Some sections link to each other: Manage Types in Equipment opens Equipment types, Manage Skills in Users opens Skills, and the bank-holiday status in a site's form links to Bank holidays for that site.
General
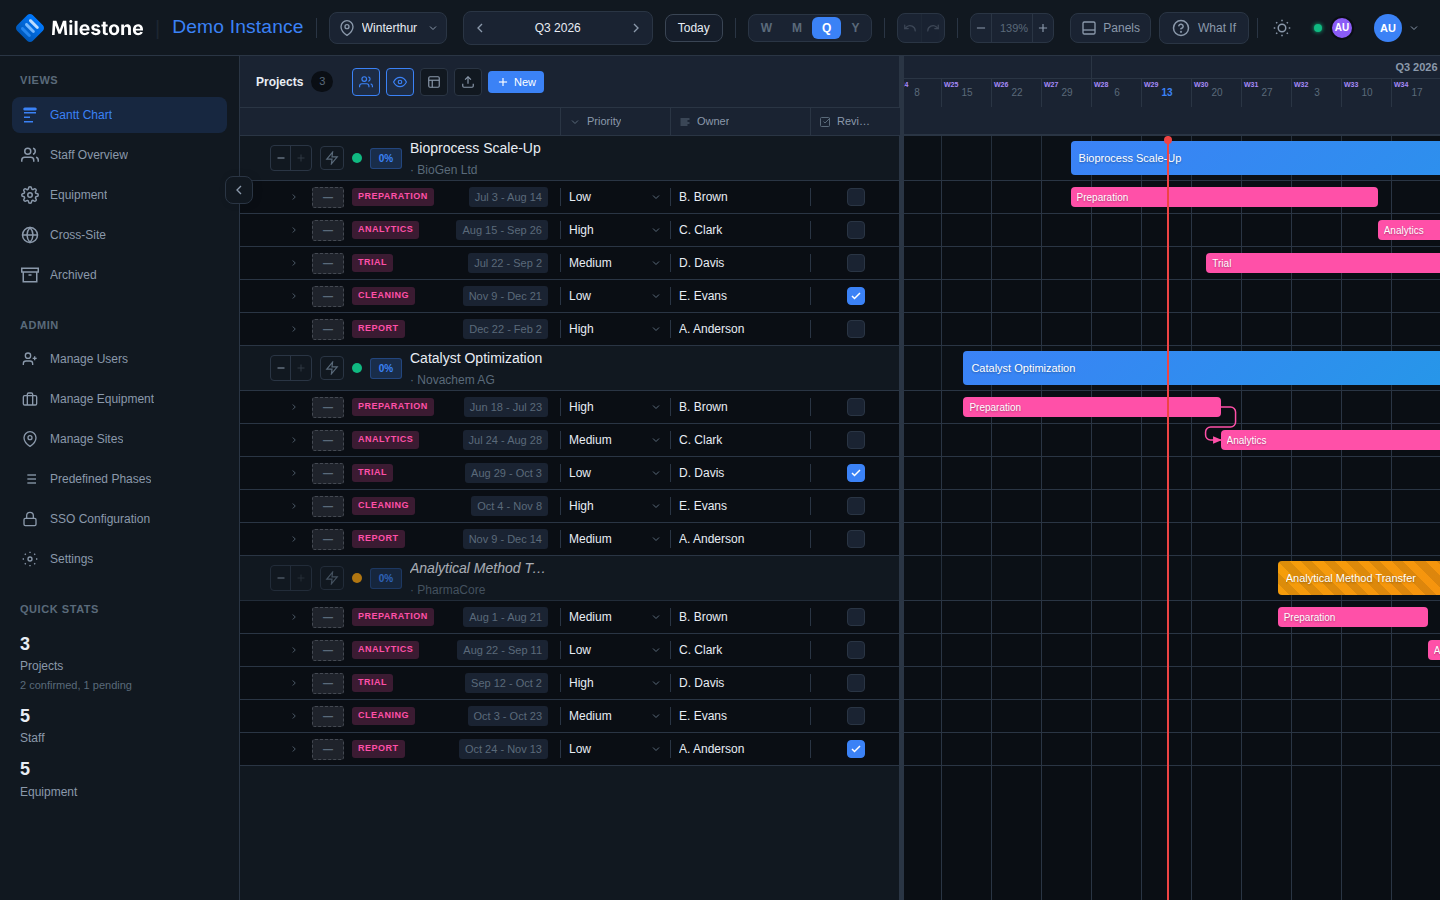
The General section holds the theme picker and, for admins, the instance-wide settings. Superusers only see Appearance (the theme family of their own browser); the instance title, branding and display defaults are admin-only.
Instance Settings
- Application Title — Name displayed in the header and browser tab (e.g., "ACME R&D Planner")
Branding & Themes
- Choose from available theme families (color schemes) — applied immediately and saved in this browser only
- Toggle light/dark mode using the sun/moon icon in the header
- Upload custom logos for dark and light themes (drag-and-drop or click to browse)
- Click Remove to revert to the default Milestone logo
Display Settings
| Setting | Description |
|---|---|
| Default View | Initial timeline granularity: Week, Month, Quarter, or Year |
| Week Starts On | Monday or Sunday |
| Show Weekends | Toggle weekend columns on/off |
| Auto-expand Projects | Automatically expand all projects on load |
Sites
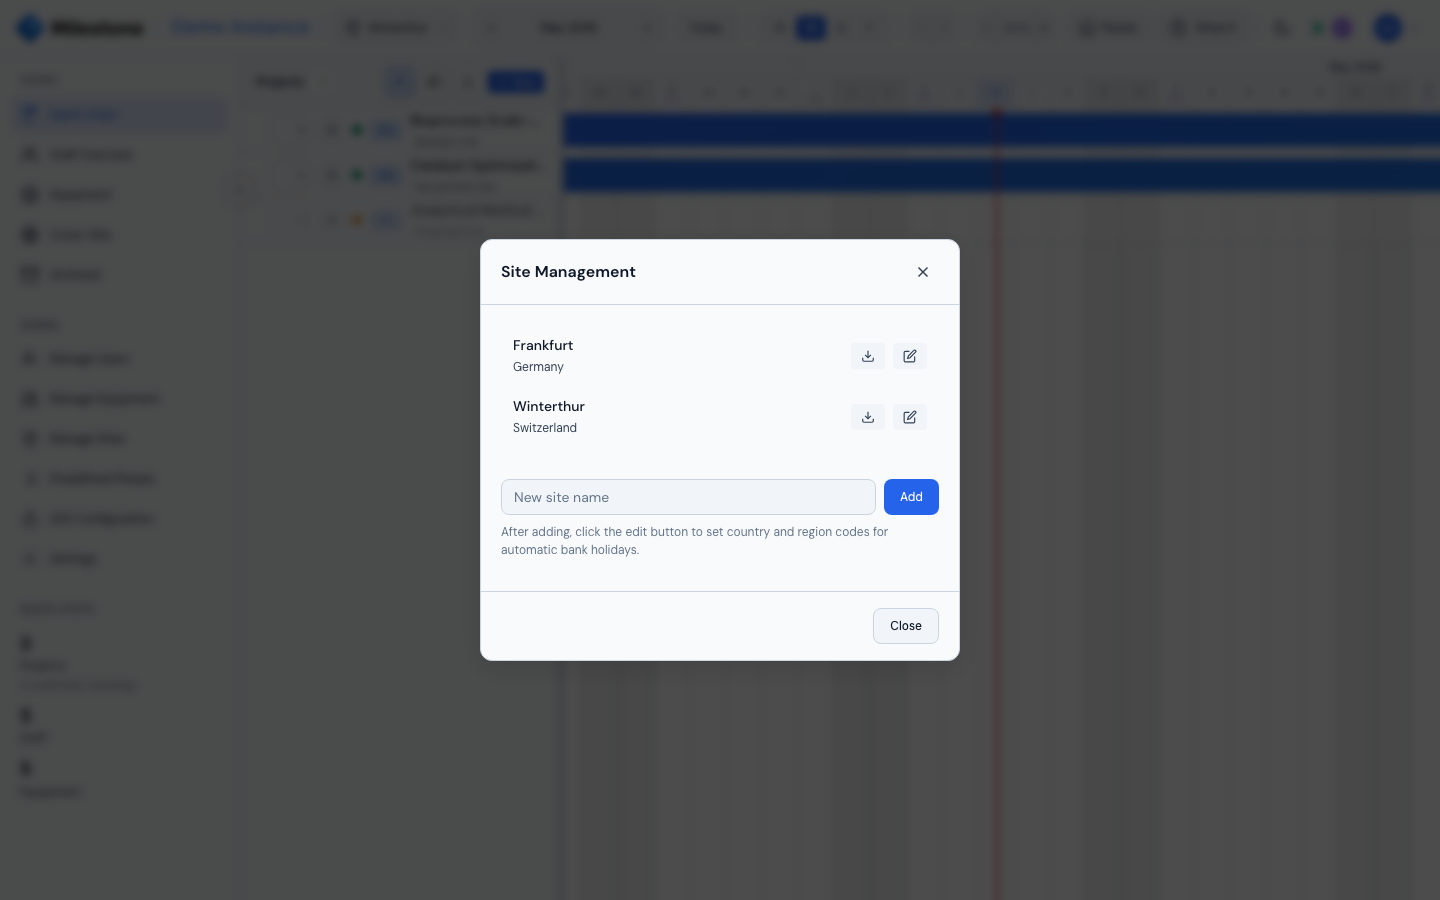
Sites represent your organization's physical locations. Projects, staff, equipment, and holidays are all scoped to sites. Open Settings → Sites (Admin only) to manage them.
Creating a Site
- Open Settings → Sites
- Enter a site name in the text field (e.g., "Winterthur HQ")
- Click Add site (or press Enter) — the site is created with minimal fields
- Click the edit icon (pencil) on the new site to open its details form
Editing a Site
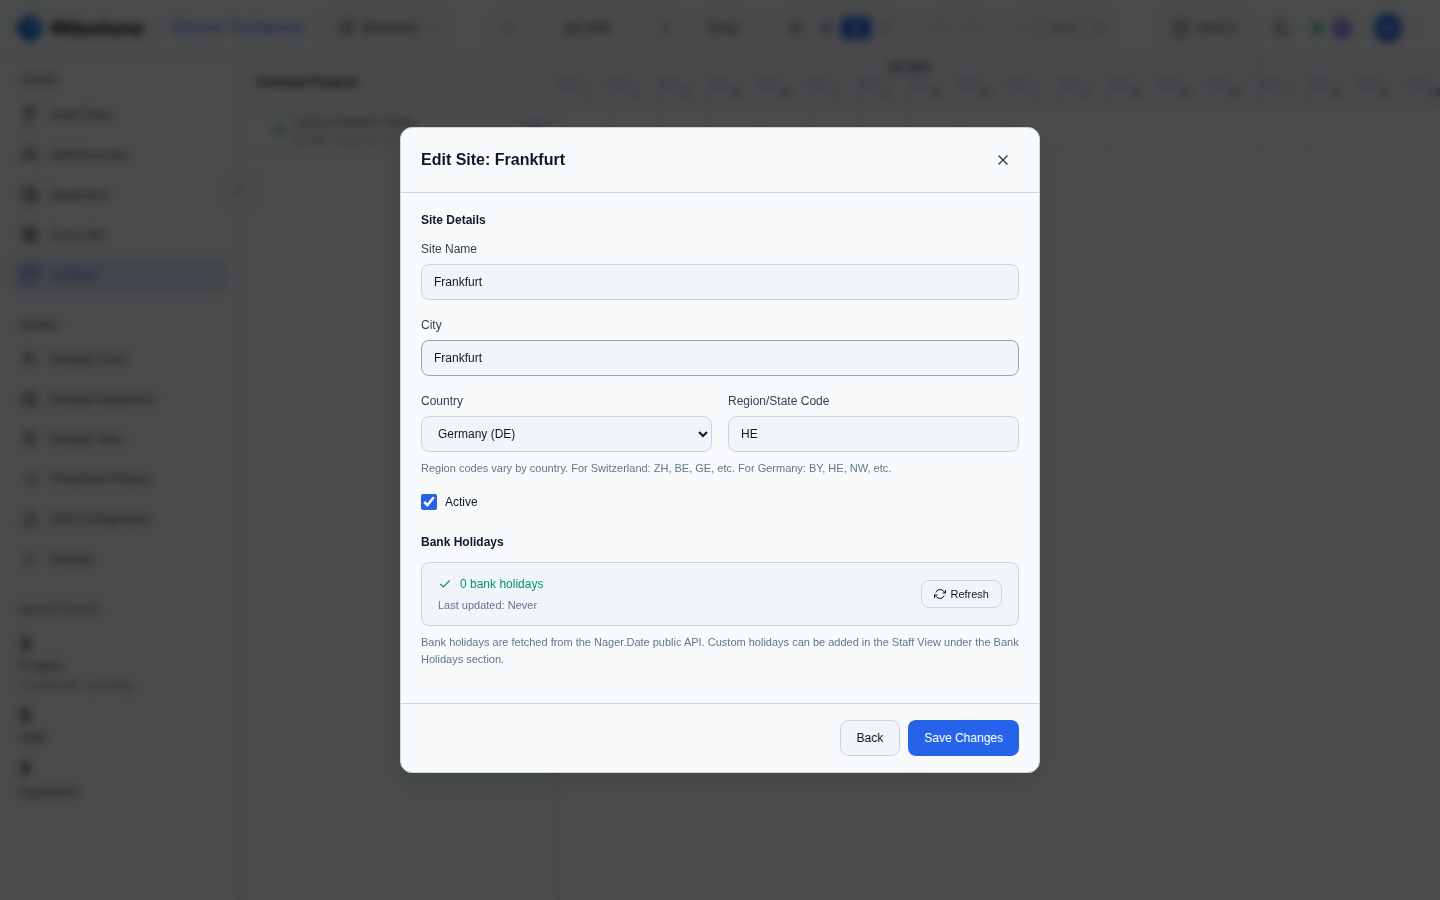
The site details form has these fields:
| Field | Description | Example |
|---|---|---|
| Site Name | Display name (required, must be unique) | Winterthur HQ |
| City | City location | Winterthur |
| Country | Country from grouped dropdown (Europe, Americas, Asia & Pacific, Africa & Middle East) | Switzerland (CH) |
| Region/State Code | Sub-region for holiday filtering — varies by country | ZH (Zurich), HE (Hesse), BY (Bavaria) |
| Active | Checkbox — inactive sites are hidden from the site selector | Checked |
Click Save Changes to save, or Back to return to the list. Emptying City, Country or Region/State Code and saving clears the value.
Tip
Setting the Country enables automatic bank holiday fetching. Adding a Region/State Code filters holidays to your specific region (e.g., canton-specific holidays in Switzerland).
Site Selector
The site selector dropdown in the header filters everything to the selected site:
- Projects visible on the Gantt chart
- Staff in the Staff Overview
- Equipment in the Equipment View
- Bank holidays and company events on the timeline
- Custom columns
Admins see all sites. Regular users only see sites they are assigned to.
Sites scope what you see, not what a superuser may edit
The site selector decides which projects, staff and equipment are shown. It is not an access boundary for project work: superusers can edit projects, phases, assignments and absences at every site. Only bank holidays, company events, equipment, equipment blocks and equipment types are limited to the sites a superuser belongs to.
Deactivating and Deleting a Site
The Sites section has no delete button: untick Active to hide a site from the site selector while keeping its data. Deleting a site is only possible through the API (DELETE /api/sites/{id}) and deletes all of its projects — with their phases, subphases, assignments, equipment bookings, Kanban comments and custom-column values — and its holidays. This now happens consistently, both in the application and at the database level. Equipment and company events shared with other sites stay on those sites; equipment or an event left without any site is deleted.
Danger
Deleting a site is irreversible and removes all data associated with it. To keep its projects, move them to another site first, or deactivate the site instead.
Bank Holidays
Bank holidays are configured per site and affect working-day calculations. They appear as highlighted columns on the Gantt and Staff timelines.
Open Settings → Bank holidays (Admins and Superusers; superusers only for sites they belong to). Pick a Site (defaults to the site you are viewing) and a Year (or All years). The table lists each holiday's date, end date, name and Source:
- Nager — fetched automatically from the public-holiday service
- Custom — added by hand, imported from a calendar file, or a Nager holiday that has been edited
From the toolbar you can Refresh from Nager, Export .ics, Import .ics and Add holiday.
Automatic Fetching
If a site has a country set, Milestone can auto-fetch public holidays from the Nager holiday API:
- In Settings → Sites, edit the site and set its Country (and optionally Region/State Code), then click Save Changes
- In Settings → Bank holidays, select the site and click Refresh from Nager (the Refresh button in the site's details form does the same) — Milestone fetches public holidays for the current and next year
- If a region code is set, only holidays that apply nationally or to that region are included
- Only public and bank holidays are imported — school, observance and optional days don't affect working-day calculations
The last refresh timestamp is shown in the site's details form: "Last updated: April 2026".
A refresh replaces the site's Nager holidays but never touches custom ones. A custom holiday also wins over Nager for every day it covers: Nager entries falling on those days are not added, so an edited or imported holiday is never duplicated. A Nager entry is also skipped when a custom holiday in the same year has the same name (ignoring case and surrounding spaces) — that is how a holiday you moved to another date is recognised.
Holiday names are in English
Imported holiday names come from the holiday API in English (for example Swiss National Day rather than Nationalfeiertag). To use another name, edit the holiday — it becomes a custom holiday and keeps your name across refreshes.
Behind a corporate firewall?
Fetching holidays is an outbound call from the Milestone server to nagerholidays.com.
If your network blocks server-to-internet traffic, ask your administrator to allow it —
see Network & Firewall Requirements.
Everything else keeps working if it's blocked — and you can still fill the site's holidays
by importing an .ics file.
Adding a Holiday
- Click Add holiday
- Enter the Name (e.g., "Company Anniversary")
- Set the Date (required)
- Optionally set an End date for multi-day holidays
- Save
Added holidays are custom holidays for the selected site.
Editing and Deleting Holidays
Every holiday can be edited or deleted with the icons at the end of its row, whatever its source:
- Editing a Nager holiday turns it into a Custom holiday. It keeps your changes on the next refresh instead of being overwritten or duplicated. A holiday moved to another date is recognised by its name, so the original does not come back — but if you both rename and move it, the refresh no longer recognises it and the Nager original returns at its original date. Keep the original name when you move a holiday.
- Deleting a Nager holiday removes it until the next Refresh from Nager, which brings it back. To drop a public holiday for good, edit it instead (for example rename it) or accept that it returns on refresh.
- Deleting a custom holiday removes it permanently.
Importing Holidays from a Calendar File
Use Import .ics to load holidays from a calendar export — useful when the server cannot reach the holiday service, or when your HR department publishes the official calendar as a file.
- Click Import .ics
- Under Import into, tick one or more target sites (the selected site is preselected)
- Drop an
.icsfile onto the upload zone, or click to browse - Review the preview: one file can hold many entries, and yearly recurring entries are expanded into one row per year (from last year up to two years ahead). Entries that already exist on the site (same date and name) are flagged Exists and unticked; yearly rows are flagged Yearly
- Untick anything you don't want and click Import
A summary shows how many holidays were created and skipped. Imported holidays are stored as custom holidays. Entries with a recurrence other than yearly, cancelled entries, and entries without a date are listed as not imported with the reason.
Calendar files are limited to 5 MB (for holidays, company events and absences alike); for a larger export, export a shorter date range. Large files are imported in batches of 500 entries, so a long export is fine as long as it stays under the size limit. .ics imports are unavailable in What-If mode.
Exporting Holidays to Calendar
Click Export .ics to download the holidays currently listed (selected site and year) as an .ics calendar file. The Export to Outlook button on the Bank Holidays row of the Staff Overview does the same for the current site. Import the file into Outlook, Google Calendar, or any calendar app.
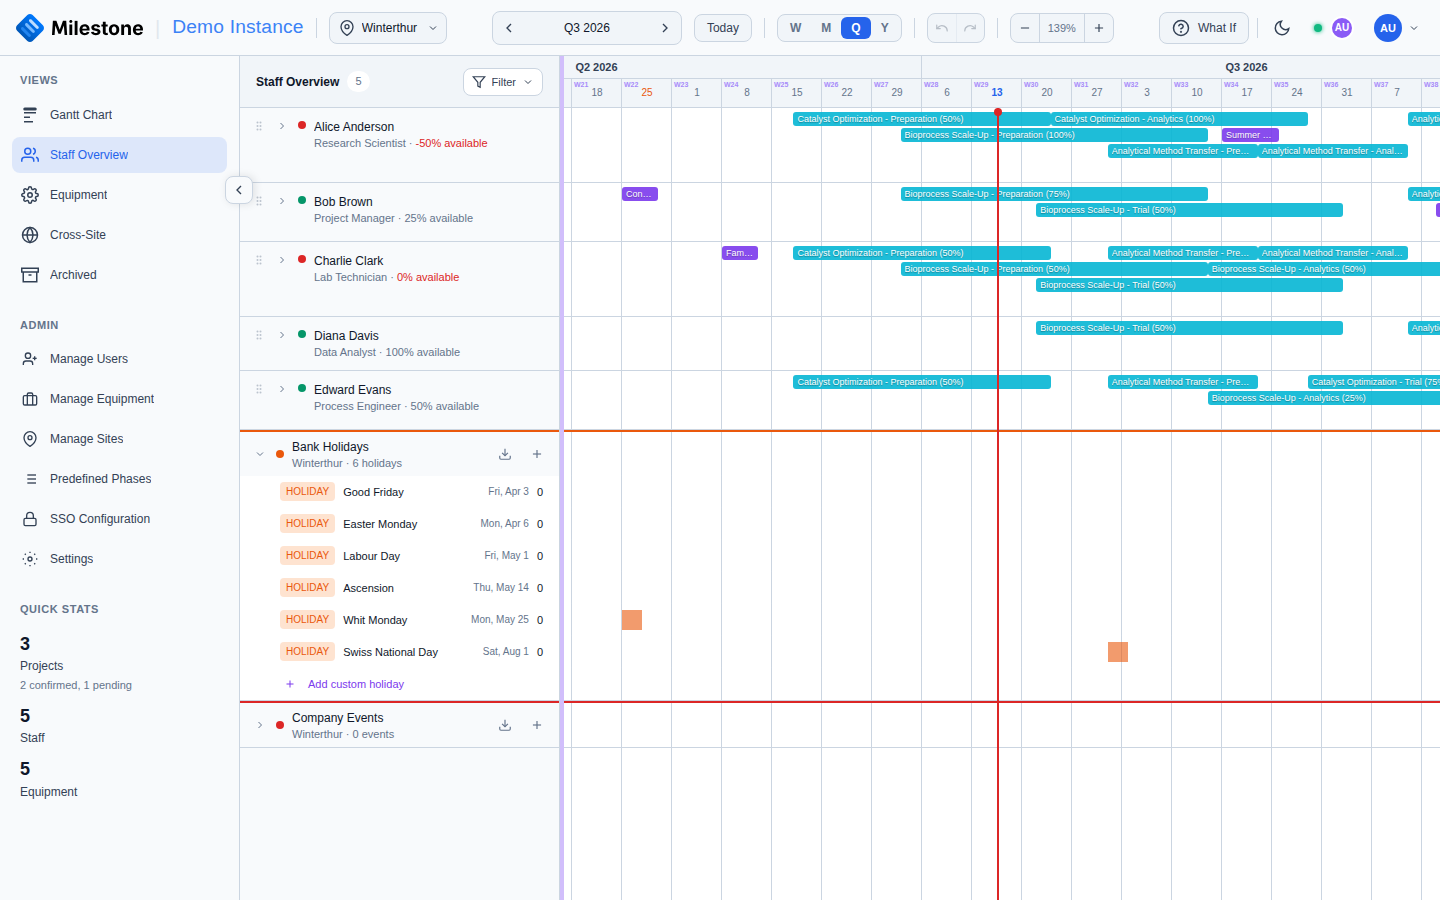
Holidays in the Staff Overview
Expand the Bank Holidays row in the Staff Overview to see all holidays for the current site. Each entry is labelled Holiday (from the holiday service) or Custom. Admins and superusers can click an entry to edit it in Settings, delete it with the × button, or click + Add custom holiday to open Settings → Bank holidays with the add form ready.
How Holidays Affect the Timeline
- Holiday dates appear as shaded columns on the Gantt timeline
- They are not counted as working days in working-day calculations
- They do not reduce anyone's capacity in the Staff workload view — to take a site's staff out of the plan for a day, add a company event marked as a site closure
- The Staff View shows holiday labels in the timeline header
Note
Only Superusers and Admins can add, edit, delete, import and refresh holidays — superusers only on sites they belong to. Regular users can view holidays but not modify them. Changes appear for other signed-in users straight away.
Company Events
Company events are dated markers shown on the timeline (e.g., "ISO Audit", "All-Hands Meeting", "Annual Retreat"). One event can apply to several sites, so an audit or shutdown is entered once instead of once per site. An event can also be marked as a site closure, which makes the staff of its sites unavailable for its dates.
Open Settings → Company events (Admins and Superusers). Filter by Site (or All my sites) and Year. The table shows each event's dates, name, color and Sites; site closures carry a Closure badge.
Adding and Editing an Event
- Click Add event, or the edit icon on an existing event
- Enter the Name (e.g., "ISO Audit")
- Set the Start date (required) and optionally an End date for multi-day events
- Under Sites, tick every site the event applies to. Superusers can only choose sites they belong to
- Pick a Color
- Tick Site closure — staff on these sites are unavailable if the sites are closed on those dates (see Site Closures)
- Save
Editing an event changes it on every site it is linked to.
Deleting an Event
- In Settings → Company events, the delete icon removes the event from all of its sites (the confirmation lists them).
- Superusers can't edit or delete an event that is also shared with sites they don't manage (the edit and delete icons are disabled). Instead, Remove from my sites (the broken-link icon) unlinks it from their own sites; the other sites keep it.
- In the Staff Overview, the × on a Company Events entry deletes a single-site event. For an event shared with other sites, it only removes the event from the current site; the other sites keep it.
Importing and Exporting Events
Import .ics works like the holiday import: choose the target sites under Add the events to, pick a default Color for the imported events, optionally tick Site closure — staff on these sites are unavailable, drop the file and review the preview. The closure tick applies to the newly created events only. An event that already exists with the same dates and name is not duplicated — it is linked to any selected sites it is missing and keeps its own closure setting. Export .ics downloads the events currently listed; site closures are exported as busy / out of office time, plain events as free time.
How Events Appear
- Company events display as colored markers on the Staff Overview timeline
- A plain event is informational only — it does not affect working day calculations or staff availability
- Events are visible to all users on the sites they are linked to
- In the Staff Overview, admins and superusers can click an event to edit it in Settings, or click + on the Company Events row to add one
Site Closures
Tick Site closure — staff on these sites are unavailable on an event for a shutdown, a company holiday or anything else that closes a site. For every day of the event, everyone who belongs to one of the event's sites is treated as away, like an absence that counts as unavailable:
- In the Staff workload view their cells show 0% available in the event's color, with the tooltip Site closed: <event name>. Work assigned on those days is flagged as a conflict
- Today's availability in the Staff Overview and on the resource cards shows them as unavailable during a closure
- Their assignment bars in the Gantt chart are marked on the closed days
- The timeline columns of the event get a stronger, hatched tint, and the Staff Overview's Company Events row labels the entry Closure instead of Event
A person on several sites is unavailable when any of their sites is closed. Plain events and bank holidays do not reduce anyone's availability — only events marked as closures do.
The site export's Company events sheet has a Staff unavailable column showing which events are closures.
User Management
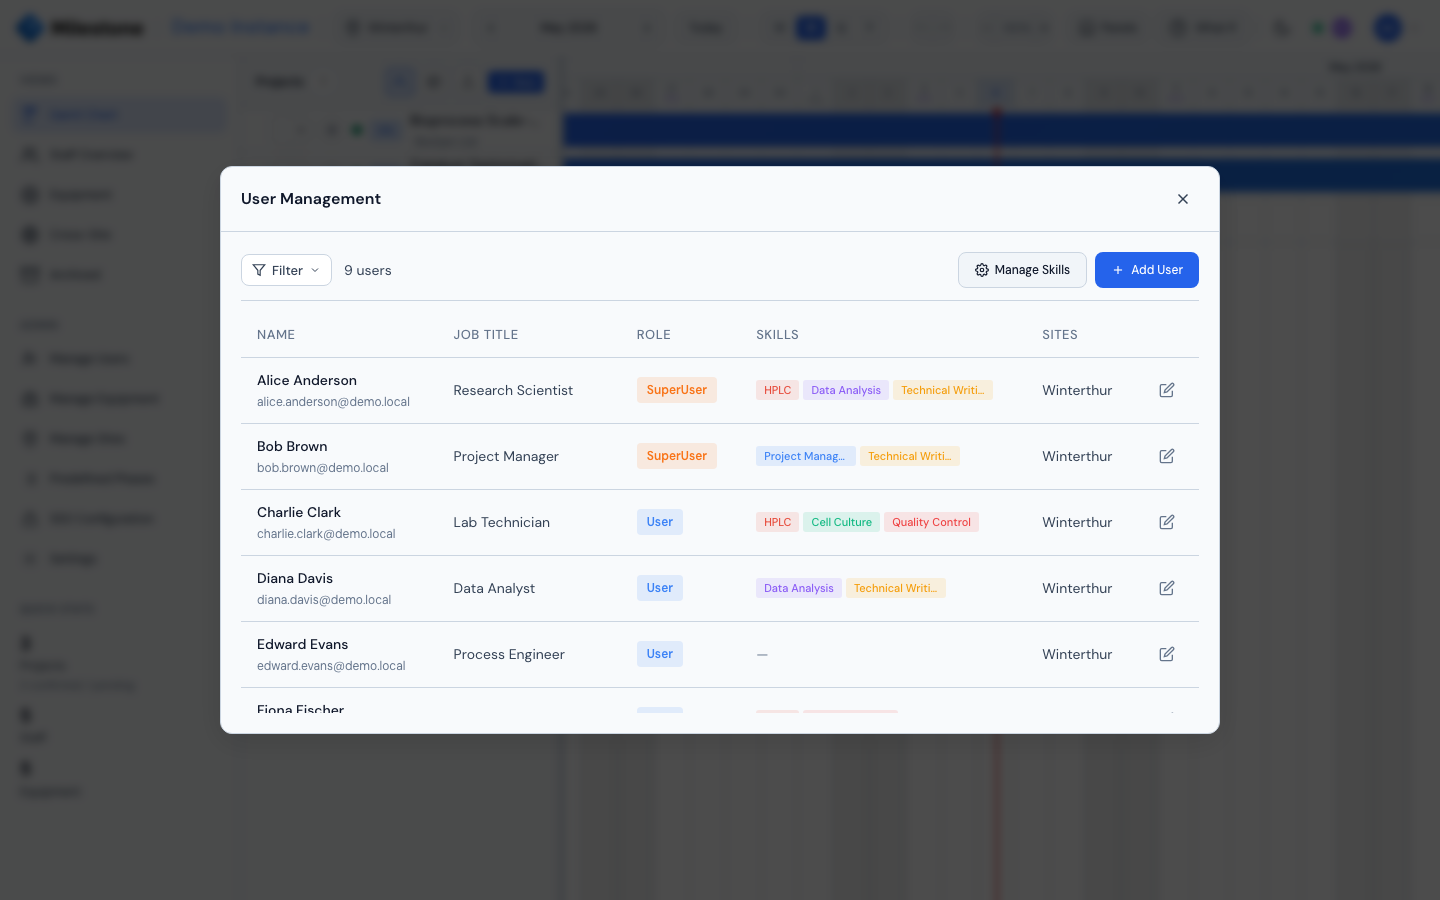
Open Settings → Users to manage accounts. Administrators can create, edit, deactivate and delete users and change their roles; superusers can view users and edit their details, sites and skills, but cannot create, delete, enable/disable users or change roles — for them the role and active status are shown read-only. Superusers cannot change other users' email address or password, and cannot edit administrator accounts. An admin cannot change their own role, deactivate or delete their own account.
Deactivating, deleting or demoting a user, or resetting their password, signs them out everywhere immediately, including live updates in open tabs.
User Fields
| Field | Description |
|---|---|
| Login email address (unique) | |
| Password | Required for new users, optional when editing (leave empty to keep it). New and changed passwords need at least 8 characters and at most 72 bytes; existing shorter passwords keep working until they are changed |
| First Name / Last Name | Display name |
| Job Title | Role description shown in staff lists. Free-text with autocomplete suggestions — see Job Title Suggestions |
| Role | Admin, Superuser, or User (see below) |
| Sites | One or more sites the user can access |
| Skills | Tags for resource planning (see Skills Management below) |
| Active | Deactivate to prevent login without deleting |
User Roles
| Permission | Admin | Superuser | User |
|---|---|---|---|
| View projects & timeline | Yes | Yes | Yes |
| Create and delete projects | Yes | Yes | No |
| Edit a project, its phases, subphases and Kanban cards | Yes | Yes | Project manager of that project |
| Manage staff assignments | Yes | Yes | Project manager of that project; anyone for their own time ("Assign me") |
| Manage equipment assignments | Yes | Yes | Project manager of that project |
| Enter What-If mode (from the Gantt chart) | Yes | Yes | No |
| Manage bank holidays & company events (own sites) | Yes | Yes | No |
| Edit users, skills, equipment, equipment types, predefined phases | Yes | Yes | No |
| Create, delete, enable/disable users; change roles | Yes | No | No |
| General settings, sites, absence types, SSO | Yes | No | No |
| Book own absences (My absences) | Yes | Yes | Yes |
Filtering Users
The user management table supports filtering by:
- Status: Active / Disabled
- Role: Admin / Superuser / User
- Job Title: Dynamic list from existing users
- Site: Filter by site assignment
- Skills: Filter by assigned skill
The results count updates as filters are applied (e.g., "12 users (filtered from 20)").
Job Title Suggestions
The Job Title field is a free-text input backed by an autocomplete dropdown. It does not have a separately managed list — instead, it suggests every distinct job title already used by another user on this instance. This keeps titles consistent across the team without an admin needing to curate them.
How it behaves:
- Click or focus the field to see all existing titles, sorted alphabetically.
- Start typing to narrow suggestions to those containing what you've typed (case-insensitive substring match).
- Pick a suggestion with the mouse or ↑ / ↓ arrow keys + Enter.
- Type a brand-new value and just save — the entry doesn't have to match a suggestion. Once saved, that new title becomes a suggestion for the next user added.
- Press Escape to close the dropdown without picking anything.
- The dropdown is scrollable when the list is long and stays anchored to the input even on small screens.
Notes:
- SSO-provisioned users (Microsoft Entra ID) receive their job title
directly from the
jobTitleclaim returned by the identity provider — these are written to the user record as-is and become available as suggestions for the next user you create manually. - Renaming a title on one user does not propagate to other users; you must edit each user individually if you want to retire an old title. An old title only stops appearing in suggestions once no remaining user has it set.
Skills Management
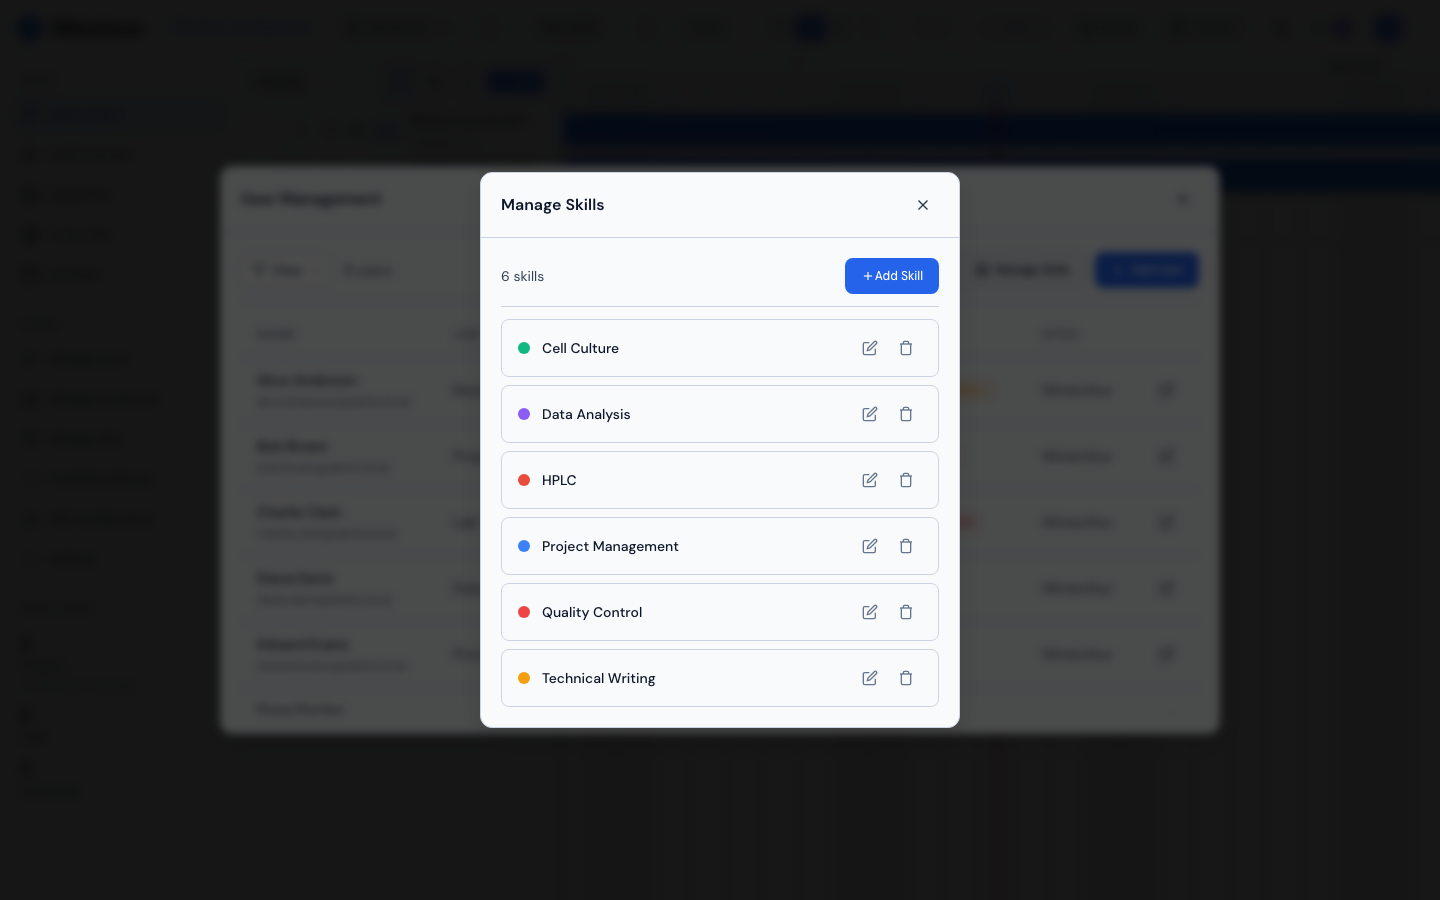
Skills are colored tags assigned to staff members for resource planning and filtering. Open Settings → Skills (or Manage Skills in the Users section).
Creating a Skill
- Click Add Skill in the Skills section
- Fill in:
- Name (required, max 100 characters, must be unique)
- Description (optional)
- Color — choose from 10 preset colors or use the custom color picker:
- Presets: Blue, Purple, Green, Amber, Red, Cyan, Pink, Lime, Orange, Indigo
- Custom: Click the color picker to choose any hex color
- A live preview shows the skill name with its color dot
- Click Save
Editing a Skill
Click the edit icon on any skill in the list to modify its name, description, or color. Changes apply immediately to all users who have the skill assigned.
Deleting a Skill
Click the trash icon on a skill. A confirmation dialog warns: "This will remove the skill from all users who have it assigned." Deletion cascades to remove the skill from every user.
Assigning Skills to Users
- Open Settings → Users and edit (or create) a user
- In the Skills section, click skill buttons to toggle them on/off
- Selected skills show a blue-tinted background with a color dot
- Unselected skills show a gray border
- To create a new skill inline, click + New skill, type a name, and press Enter
- Save the user — skills are updated immediately
Filtering Staff by Skills
In the Staff Overview, open the Filter panel:
- Under the Skills section, check one or more skills
- Each skill shows its assigned color dot next to the name
- Staff members matching any of the selected skills are shown (OR logic)
- The header updates to show the filtered count: "8/20 staff"
- Click Clear All to reset all filters
Skills are also visible as colored badges in the Users table (first 3 shown, "+N" for additional).
Absence Types
Absence types are the kinds of time off people can book — for example Holidays, Home Office or Illness. They are shared by all sites and managed by admins in Settings → Absence types. Every absence is booked with a type; see Vacations & Time Off for how they are used.
New installations and upgraded ones start with these types:
| Type | Counts as unavailable |
|---|---|
| Holidays | Yes |
| Home Office | No |
| Illness | Yes |
| Business Trip | Yes |
| Training | Yes |
Absences that existed before absence types were introduced are filed under Holidays.
Managing Types
Each type has:
- Name — must be unique
- Color — used for the absence bars and badges in the Staff Overview and on the timeline
- Counts as unavailable — when ticked (Holidays, Illness…), the absence removes the person's capacity in the workload views. When unticked (Home Office), the absence is shown on the timeline but the person stays available for planning
- Active — inactive types are hidden when booking a new absence, but existing absences keep their label and color
To add a type, enter a name at the bottom of the list (e.g., "Parental leave"), choose whether it counts as unavailable, pick a color and add it. Click the edit icon to change a type's name or color, and use the toggles to change the other settings. Drag types to reorder them — the order is used in every absence-type picker.
Deleting a Type
A type can only be deleted while no absence uses it. If it is in use, deletion is refused with "in use — deactivate it instead": untick Active so it is no longer offered for new absences.
Equipment Types
Equipment types categorize your inventory for filtering in the Equipment View. Manage them in Settings → Equipment types, or click Manage Types in the Equipment section.
Creating Types
A type exists as long as at least one piece of equipment uses it, so types are created through equipment: when creating or editing an equipment item, click + New type, enter a name, and confirm. The type is saved with the equipment item. (Settings → Equipment types has no Add Type button any more — a type without equipment could not be stored.)
Renaming Types
- Open Settings → Equipment types
- Click the edit icon on a type
- Enter the new name
- Click Rename Type
Note
Renaming a type updates all equipment items that use it. A warning shows how many items will be affected.
Deleting Types
Click the delete icon on a type and confirm. A type can only be deleted once no equipment item uses it; if equipment still uses it, the deletion is refused with a message telling you to change those items' type in Equipment first.
Superusers can rename or delete a type only when every piece of equipment of that type is at one of their sites; otherwise the change is refused, because types are shared by the whole workspace.
Type Filtering
In the Equipment View, use the type filter dropdown to show/hide equipment by type:
- Click the filter button to open the dropdown
- Use Select All / Clear for quick selection
- Check individual types to filter
- The filter button shows the active count (e.g., "3 types")
Tags
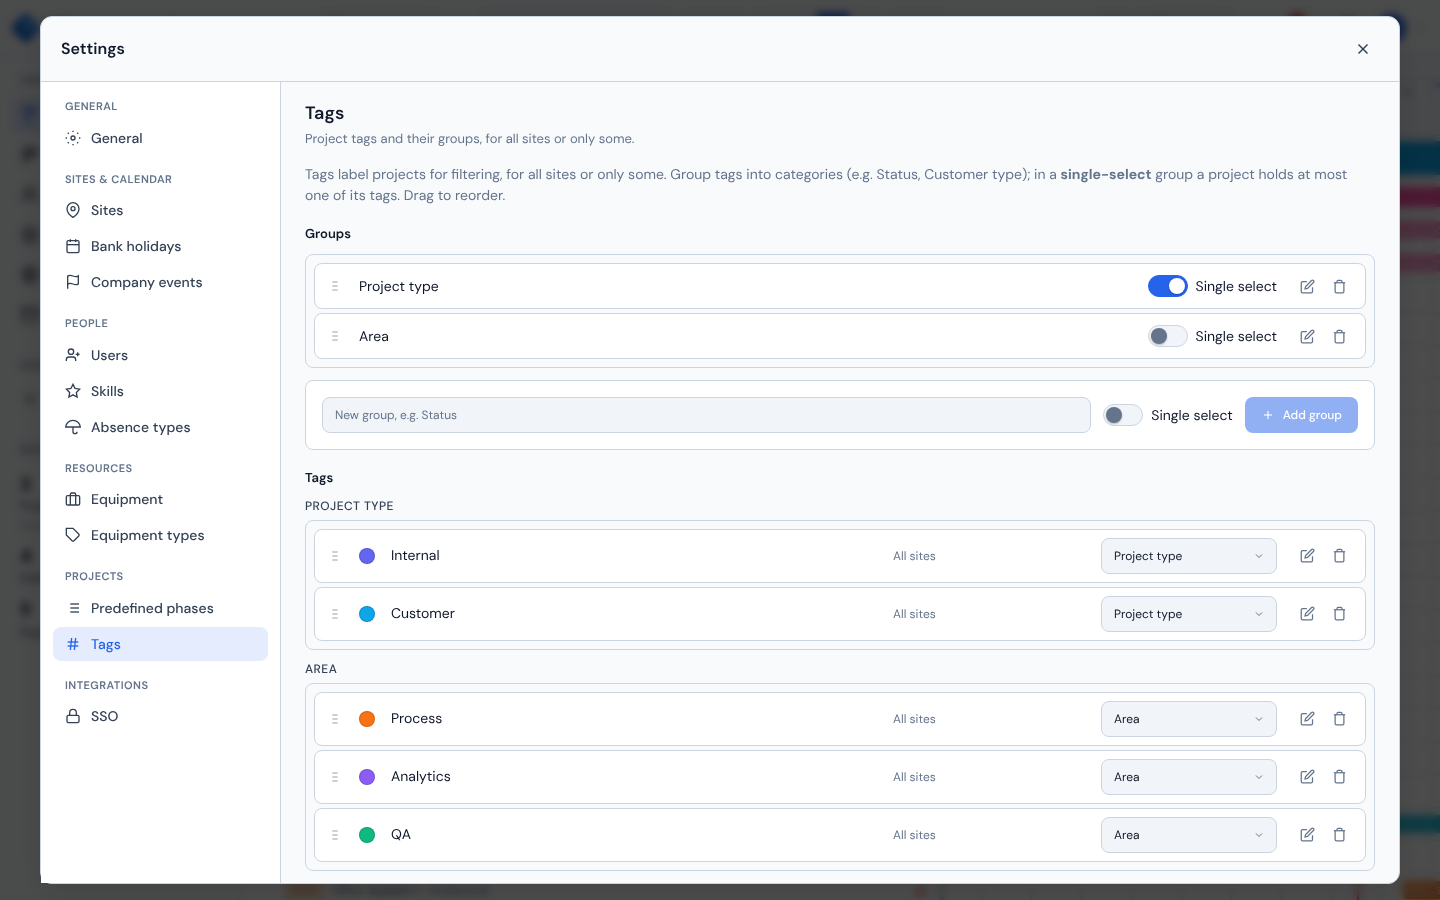
Tags are coloured labels attached to projects (see Tags in the Gantt chart). Admins manage them in Settings → Tags; everyone who can edit a project attaches them from the project dialog.
Tag Groups
A group turns a set of tags into a category, for example Project type with the tags Internal and Customer.
- Single select — A project can carry at most one tag of the group. In the project dialog the group's tags behave like radio buttons: choosing one replaces the other.
- Order — Drag groups to change the order in which they appear in the picker and the filter.
- Delete — The group's tags are kept and become ungrouped.
Switching a group to single select is refused while any project holds two or more of its tags; the message says how many projects need attention first.
Colouring the Gantt project bars by a group is not set here: each user picks it with Colour by in the Gantt chart (see Project colours).
Managing Tags
Tags are listed under their group, with ungrouped tags under Other.
- Name and colour — Edit the name inline; pick a colour from the swatches or enter a custom one.
- Group — Move a tag into a group or out of it. Moving it into a single-select group is refused if a project already holds another tag of that group together with it.
- Sites — By default a tag applies to all sites. Switch that off to pick the sites where the tag is offered. Restricting a tag is refused while projects at a site you are removing still use it. Deleting a site also deletes tags that were limited to that site only.
- Order — Drag tags to reorder them within their group.
- Delete — Removes the tag from every project; you are asked to confirm.
Predefined Phases
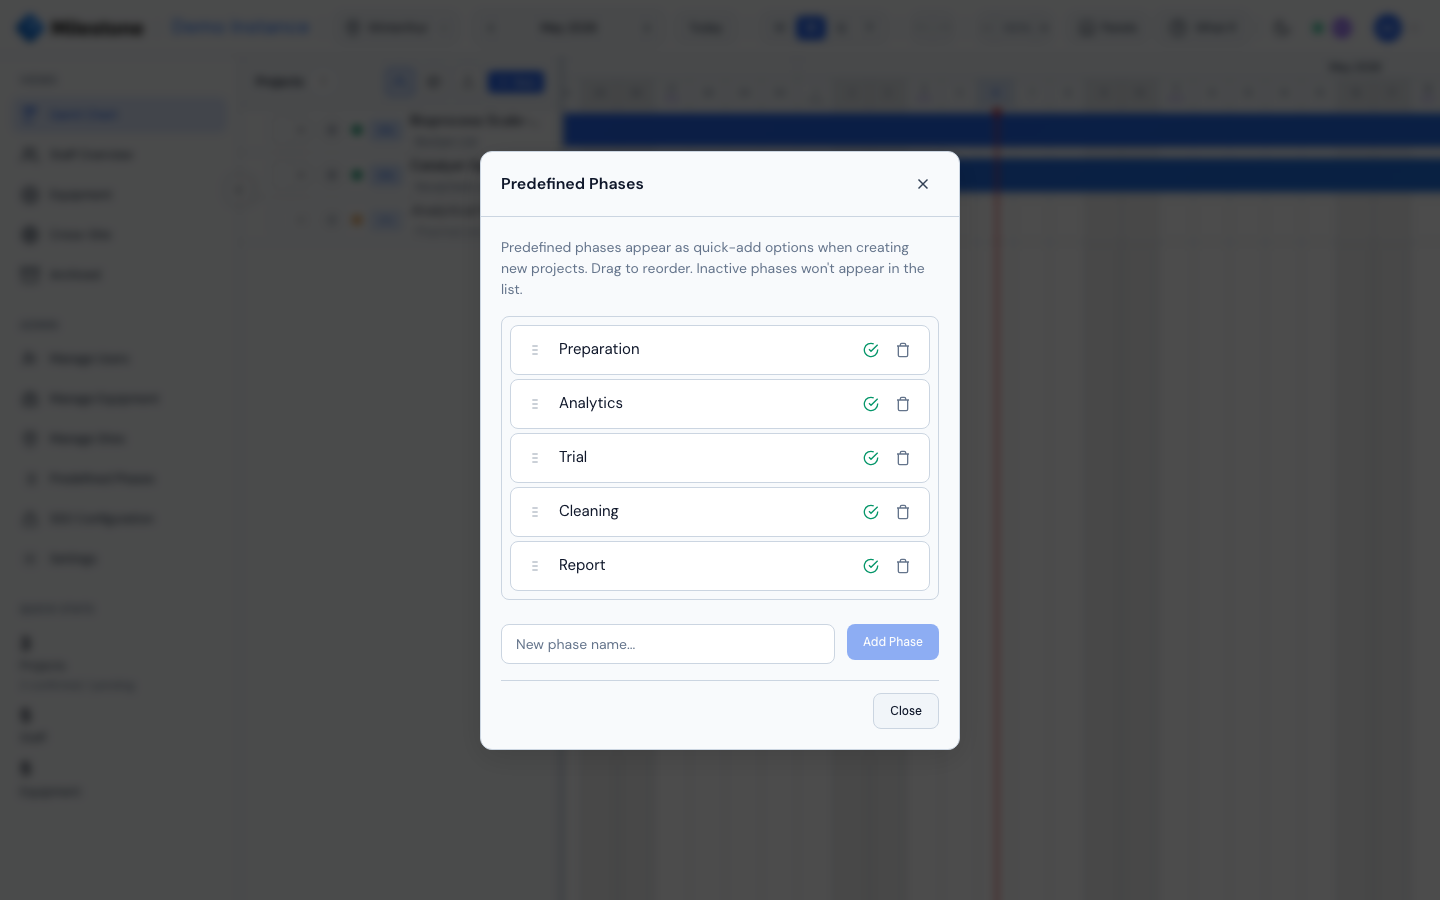
Phase templates that appear as pre-selected options when creating a new project.
Managing Templates
- Open Settings → Predefined phases (Admins and Superusers)
- Each template has:
- Name — The phase name (e.g., "Planning", "Execution", "Review")
- Color — Color used for the phase bar on the timeline
- Active/Inactive — Only active templates appear in the project creation modal
- Display Order — Drag to reorder how templates are listed
How Templates Work
When creating a new project, all active predefined phases are pre-selected as checkboxes. Uncheck any you don't need for that project. The selected phases are created with default durations matching the project's start and end dates.
Adding a Template
- Click + Add Phase
- Enter the name and pick a color
- The new template is active by default and appears at the end of the list
- Drag to reorder as needed
Custom Columns
Add custom data fields to the project panel in the Gantt chart. See Gantt Charts — Custom Columns for full details on creating, editing, and using custom columns.